


Today I'm going to show you how you can RDP to a Win Pro PC that is joined to Azure AD. You may say, why is this any different to just RDP-ing (is that even a phrase??) 🙂 to a Win 10 On-Premise joined to a domain or a Workgroup PC?
Essentially it is, and here I will show you how it can be done.
Just a bit of background on how we got here. We have a client that has two offices, each one located across town from the other. They wanted to access a computer that runs experiments at "Location A", from "Location B". All PCs for this particular client are joined to Azure AD.
We thought this was a simple enough request and decided to setup a VPN to facilitate this requirement and ensure that port 3389 was open through the PC firewall. All goes swimmingly. We tested this with one of the clients' users and it all worked flawlessly. Excellent we thought, job done!
I did some additional testing to ensure this was available outside the corporate network so the users could do this from home as well. I was testing from my office here and connected via VPN and tried to connect to the PC via RDP. To my surprise I received the following error:
The credentials that were used to connect to <PC Name> did not work. Please enter new credentials.
Here is the screenshot:
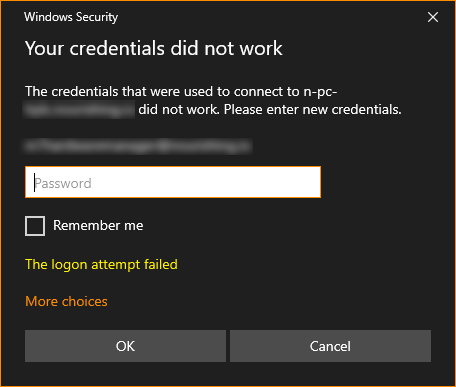
I could ping the PC over the VPN and as you can see from the screenshot above, it was requesting my credentials so the connection was OK. The account I was using was an Administrator account and by default, this is allowed to RDP to the PC. To make sure I decided to run the following command line syntax to add the account to the PC's local Remote Desktop Users group:
net localgroup "Remote Desktop Users" /add "AzureAD\[email protected]"
Just replace [email protected] in the syntax above with the Azure AD account you want to allow to be given permission to RDP to the computer.
After completing that and testing again, I received the same result. Wow! How weird! How come the user had tested this successfully could connect without issue, yet I as an Admin of the PC couldn't.
I then created a local admin account on the PC and tried to connect using that account, and BAM! Connected without issue. I created another account without admin permissions, tested and BAM again! Connected without issue.
So what's going on here? Why could I not connect using my Azure AD credentials, yet could connect with local credentials.
Obviously this has something to with Azure AD membership. I can only assume because the company user who was connecting to the computer via RDP successfully, his computer was a member of the same Azure AD tenant. My PC is a member of our on-premise company domain so that is the only difference. I even checked that both computers were up to date with Windows Updates and patches.
So how do you fix it? The issue requires you to add a couple of entries into a custom RDP file to change the way the Authentication is done. Follow the steps outlined below after you've opened the MS Remote Desktop Client:
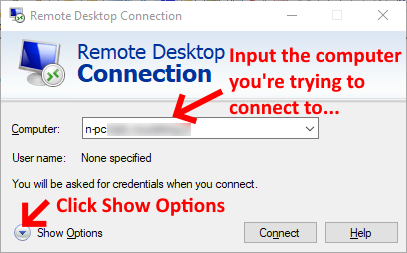
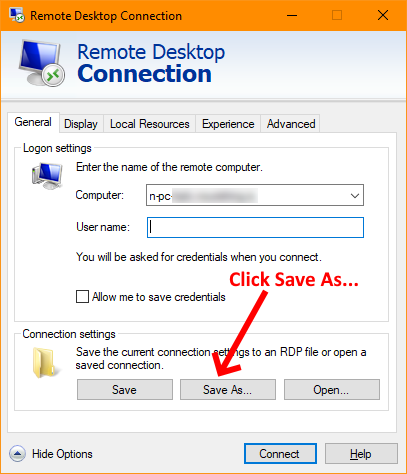
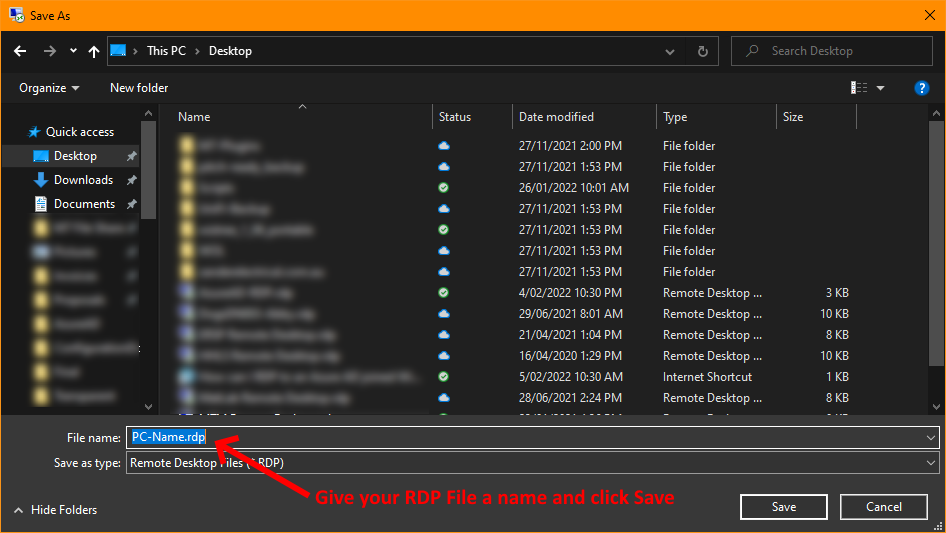
Now navigate to where you saved your RDP file to and open the file in your favourite text editor. I use Notepad++, but you can use any editor you wish. Once you've opened it you should see something similar to this:
screen mode id:i:2
use multimon:i:0
desktopwidth:i:1920
desktopheight:i:1080
session bpp:i:32
winposstr:s:0,3,0,0,800,600
compression:i:1
keyboardhook:i:2
audiocapturemode:i:0
videoplaybackmode:i:1
connection type:i:7
networkautodetect:i:1
bandwidthautodetect:i:1
displayconnectionbar:i:1
enableworkspacereconnect:i:0
disable wallpaper:i:0
allow font smoothing:i:0
allow desktop composition:i:0
disable full window drag:i:1
disable menu anims:i:1
disable themes:i:0
disable cursor setting:i:0
bitmapcachepersistenable:i:1
full address:s:n-pc-legend.companyname.com.au
audiomode:i:0
redirectprinters:i:1
redirectcomports:i:0
redirectsmartcards:i:1
redirectclipboard:i:1
redirectposdevices:i:0
autoreconnection enabled:i:1
authentication level:i:2
prompt for credentials:i:0
negotiate security layer:i:1
remoteapplicationmode:i:0
alternate shell:s:
shell working directory:s:
gatewayhostname:s:
gatewayusagemethod:i:4
gatewaycredentialssource:i:4
gatewayprofileusagemethod:i:0
promptcredentialonce:i:0
gatewaybrokeringtype:i:0
use redirection server name:i:0
rdgiskdcproxy:i:0
kdcproxyname:s:
What you need to do now is add the following to values to the end of the file you have open in your text editor:
enablecredsspsupport:i:0
authentication level:i:2
Save the file and close your text editor. Now double click the file and you should get the prompt to log onto the PC and when asked for the username type the user in the following format:
.\AzureAD\[email protected]
including the leading dot "." Obviously, replace the email address [email protected] with your email address and this time it should be successful.
That's it, your task is complete!
If you've found this useful, you may want to sign up to our newsletter where you'll receive notices on when we post new articles and helpful "how tos". Just fill out your details below and we'll do the rest…


