


Today I'm going to show you how to rectify the Windows Audio Service crashing after you connect an external webcam with a microphone. In my case, this was my work notebook which is a HP EliteBook 830 G9, but this is affecting a myriad of manufacturers so this fix should work for you as well.
I'd had this issue for a number of months while using a Logitech external webcam and I didn't pay much attention to it other than thinking the the webcam had probably incurred some type of malfunction. The easy fix was to just disconnect the camera and use the notebook camera and microphone. But, because my notebook is connected to a docking station it meant opening the lid and moving my external monitors around so the camera could capture my face which gets annoying over time.
I decided to order a new HP 4K Streaming Webcam so I could use the system the way it was intended. The added benefit is that this new Webcam supports Windows Hello, so I could use facial recognition to log onto my machine. I thought excellent, I can kill two birds with one stone here. How wrong was I!
I connected the HP Webcam and what do you know, the Audio Service still crashed. Wow! After a heap of diagnoses over a number of days and I got that frustrated with the issue, I decided to format the machine and to my dismay, the problem still persisted. Wow!
Further research finally got me to the eventual fix which I'll document for you here so you don't experience the frustrations I did. I'd like to thank Jim Rademacher for posting this... on the Microsoft forums which lead me to the eventual fix.
Please note, you'll have to have administrator permissions on the device you're applying this fix to, so any of the changes made get applied to the device properly. Let's begin...
Firstly, Open Services and find Windows Audio in the services list and double click it to open the Properties screen. Click on the Log On tab and you should see something like the following screen:
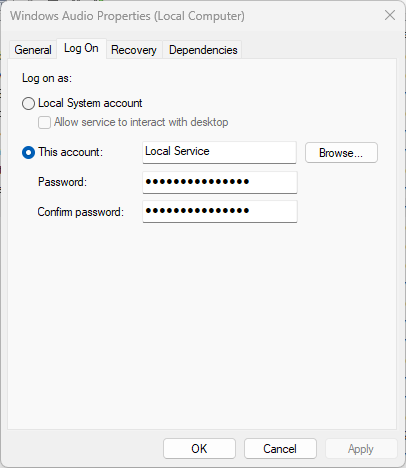
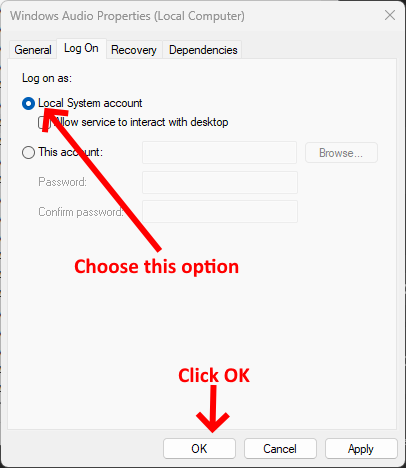
We're going to change the account with which the service runs temporarily to force it to run. The account we're going to change it to is Local System instead of Local Service. Click the browse button and follow the screenshots below:

Now open the Settings on your device using the Windows Key + I and navigate to System > Sound and find the microphone that is associated with your webcam. In may case it was the HP 4K Streaming Webcam. Scroll down until you find the option Audio Enhancements and set it to Off like the following screenshot:

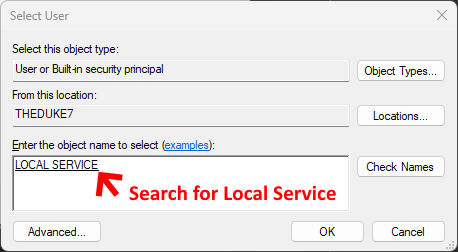
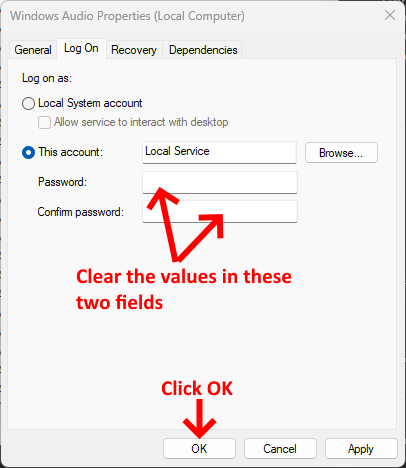
We're now going to revert the settings in the Services window that we changed earlier in this tutorial. Go back to your Services windows and double click the Windows Audio service. Click the Log On tab and select the option "This Account" and click Browse and follow the screenshot below:
Click OK once you've found the Local Service account. Once you get back to the Properties window of the Windows Audio service, clear the values of the Password and Confirm Password fields like the example below:
Finally, we're going to restart the Windows Audio service again so the changes take effect. Follow the screenshot below:
If everything has been applied correctly, the sound on your computer should now work even with the External Webcam attached to it.
If you've found this useful, you may want to sign up to our newsletter where you'll receive notices on when we post new articles and helpful "how tos". Just fill out your details below and we'll do the rest…


