We had a recent issue with a client where a new server and domain (office.companydomain.com.au) was implemented instead migrating the old companyname.local domain from the old server. AD Connect was setup and working properly on the old domain and we then implemented AD Connect on the new domain to replicate to O365.
We assumed that by uninstalling AD Connect from the old server and then running the following command via PowerShell:
Set-MsolDirSyncEnabled -EnableDirSync $false
is all that would be needed to setup the new domain by ensuring the user UPNs matched their O365 account and everything would sync accurately. How wrong was I to assume anything like this would work smoothly and without a hitch? Very wrong my friends, very wrong!
So what ended up happening? Well we discovered that when we setup AD Connect on the new server/domain and ran an initial sync it created duplicate users in O365. I couldn't understand why this would be given that the UPNs were identical to the existing ones already on O365.
The duplicate users that were created by AD Connect were in the form of:
The account above had the directory sync flag and not associated correctly with the existing account:
The above "real" account was considered a cloud only account.
So how do you fix it?
The issue I discovered was that the ImmutableID doesn't match from the on-premise Active Directory to Azure AD. Azure AD had the previous domains ImmutableID for each user and therefore this doesn't match with the new domain and hence the creation of the duplicate account.
The rectification process involves temporarily moving the affected users to an on-premise AD OU or AD Folder that is not synced by AD Connect to O365. This OU/Folder is commonly called LostAndFound, but if you customised your install of AD Connect, you could use any OU that you've decided not to sync.
Let's get started...
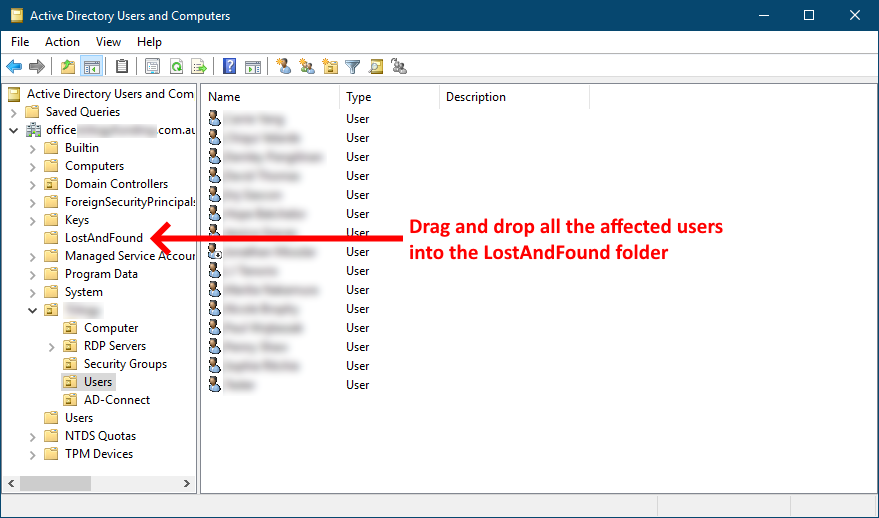
The first step is to drag and drop all the affected (duplicated) users into a non synced AD OU/Folder, which in my case was LostAndFound. LostAndFound is not synced by default by AD Connect so this should work for most people. If you don't see the LostAndFound folder click the View menu at the top of the Active Directory MMC and ensure Advanced Features is selected. See the screenshot below for an example:
Once you've complete the moving of users open a PowerShell instance as an administrator and run the following to sync the on-prem AD to O365:
Start-ADSyncSyncCycle -PolicyType Initial
Allow that to complete and you should receive the following success message:

Now you'll need to log onto the O365 portal to check the status of the users that we've just moved to the non syncing OU/Folder. They should all now be located in the Deleted users section in your O365 admin portal. Click here... and sign in with your tenant admin account.
Navigate to Users > Deleted users. Check to ensure the duplicated users are now listed. Confirm that all users are listed. This can sometimes take quite a few minutes depending on how many users you've moved, so please be patient.
Now we're going to delete these users permanently. To do this follow the steps below:
Go back to your PowerShell window and execute the following:
This will install the Azure AD online module. You only need to do this if you don't currently have it already installed:
Install-Module -Name MSonline
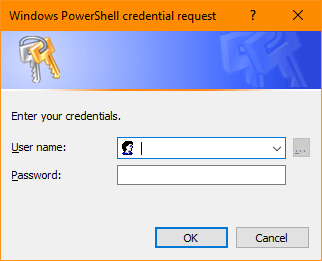
Now logon using your tenant admin account:
$msolcred = get-credential
We're now going to connect to O365 using the credentials you just used:
connect-msolservice -credential $msolcred
We're now going to delete the users in the Deleted users section on O365:
Remove-MsolUser -UserPrincipalName "[email protected]" -RemoveFromRecycleBin
Replace [email protected] in the example above with the user you wish to delete which the duplicated user you want to remove permanently. These are the users located in the Deleted users section of O365 that you reviewed earlier in this tutorial. You'll need to do this for each duplicated user you want removed permanently.
I'm sure there would be a way of deleting all the Deleted users in one line, but I think this is a safer method because you are effectively forced into checking each user that is to be deleted. You wouldn't want to accidentally delete a real account by accident.
Once you've complete the permanent deletion of all the users in the previous step, you can now go back to your Active Directory MMC and move all the users from the LostAndFound folder back to your Users folder where they were originally.
Now we're going to apply the correct ImmutableID to the correct O365 account so the users from the on-premise AD replicate to the correct O365 Azure AD account. Execute the following in your PowerShell window:
ldifde -f onprem-user-details.txt -r “([email protected])” -l “objectGuid, userPrincipalName”
Replace [email protected] in the example above with the account username from your on-premise AD that you want to find the ImmutableID. This will create a text file called onprem-user-details.txt in the current working directory of your PowerShell window.
Now navigate via Windows Explorer to where the onprem-user-details.txt file is, and open the file to see the contents. You should have something similar to the following:
dn: CN=Freddy Awesomeness,OU=Users,OU=Legends,DC=office,DC=companydomain,DC=com,DC=au
changetype: add
objectGUID:: svx5hdcV+0arl/3L0lGfNA==
userPrincipalName: [email protected]
What we're interested in is the objectGUID. This is the ImmutableID that we want to replicate to the O365 Azure AD. To do that, execute the following in your PowerShell window:
Set-MSOLUser -UserPrincipalName [email protected] -ImmutableID svx5hdcV+0arl/3L0lGfNA==
Notice I've used the objectGUID from the text file export:
svx5hdcV+0arl/3L0lGfNA==
as the ImmutableID in the syntax above. Ensure you change the [email protected] in the example above to match the account to the user you're updating. Once complete, this user will have been "hard matched" to the O365 Azure AD and will now properly replicate from the on-premise AD.
You need to execute the above two steps of exporting the text file and the updating the ImmutableID for each user that you moved back to the original location in your on-premise AD.
Once you've complete the "hard match" for each user your task is complete. Now to test your work. Execute the following in your PowerShell window:
Start-ADSyncSyncCycle -PolicyType Initial
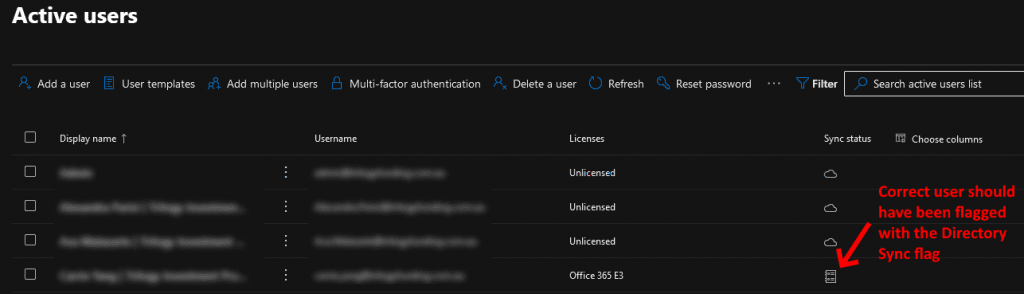
This will replicate the on-premise AD to O365 Azure AD once again. Give the task a few minutes to complete the replication job and then go and check your O365 Users to see whether they're all now replicating to the correct accounts and are flagged as a Directory Synced account and not a Cloud account like in the following screenshot example:
Once you've confirmed that all the users are now replicating correctly, you're done! Consider yourself a Super Star! 🙂
If you've found this useful, you may want to sign up to our newsletter where you'll receive notices on when we post new articles and helpful "how tos". Just fill out your details below and we'll do the rest…