
Today I'm going to show you how to setup DKIM and DMARC in your Office 365 tenant. This can be quite a confusing task so I'm going to go into some detail on how to get the relevant information to setup the necessary DNS records and finally how to put it all together.
The Microsoft documentation I found that discusses this procedure is in my opinion, both out dated and hit and miss with the content to describe what needs to be done. Especially with the new Security and Exchange admin centres.
For this tutorial you're going to need:
- Access to your O365 admin portal
- Access to your domain's DNS admin portal
- The tenant name of your O365 tenant. For example yourdomain.onmicrosoft.com. You can find this within your O365 admin portal and will be one of the options in the drop down list when you add email alias' to any of your users
- Ensure that your SPF record is setup accurately. This is outside of the scope of this tutorial, but you can read how to set up your SPF record here... You would have setup an initial SPF DNS record when you first configured your O365 tenant, but this is to just ensure your SPF record includes all the mail servers and IPs that can send email from your domain
Let's get started...
To get the correct CNAME Data value for your domain you can use PowerShell commands. Open PowerShell as an administrator and carry out the following:
Connect-MSOLService
Once you've successfully logged onto your tenant's admin account complete the PowerShell procedures outlined below:
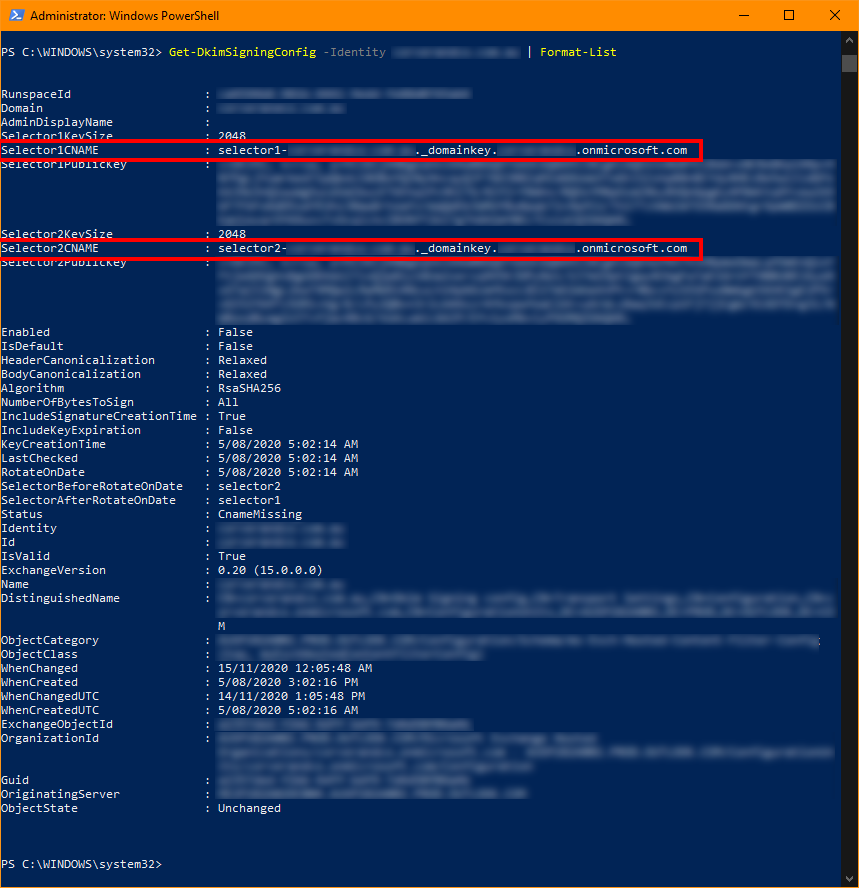
Install-Module ExchangeOnlineManagementConnect-ExchangeOnlineGet-DkimSigningConfig -Identity yourdomain.com.au | Format-List
In the last line above replace yourdomain.com.au with the domain you want to setup DKIM for. This the actual domain, NOT the onmicrosoft.com tenant domain. You should get something similar to the output in the screenshot below. The two highlighted areas show the CNAME data values you need to add to your domain DKIM DNS records:
To setup the DKIM DNS records you'll now need to log onto your domain's DNS admin portal and add two CNAME records with the values that are highlighted in the PowerShell window above:
Record Type: CNAME
TTL: 3600
Host: selector1._domainkey.yourdomain.com.au
Data: selector1-yourdomain-com-au._domainkey.yourtenantmsaccount.onmicrosoft.com
To detail what is outlined above, please replace the values outlined in the CNAME example above with your own that you obtained from your PowerShell command. Remembering that every DNS admin panel is different so you'll need to understand your DNS administration panel's idiosyncrasies. So armed with that info make the necessary changes to suit your domain and O365 tenant and create the CNAME record. Below is how the values should be formatted:
Host: Change selector1._domainkey.yourdomain.com.au with your domain. For example if I was using our domain at Matrix 7 the host would be selector1._domainkey.matrix7.com.au
Data: Change selector1-yourdomain-com-au._domainkey.yourtenantmsaccount.onmicrosoft.com to suit your tenant and domain. For example if we were to use the Matrix 7 domain, using the example above it would look like selector1-matrix7-com-au._domainkey.matrix7.onmicrosoft.com
The second CNAME is almost identical to the first outlined above except that it is selector2 rather than selector1:
Record Type: CNAME
TTL: 3600
Host: selector2._domainkey.yourdomain.com.au
Data: selector2-yourdomain-com-au._domainkey.yourtenantmsaccount.onmicrosoft.com
Customise the values for selector2 the same as the example for selector1 above, but replacing everything with the value of selector2. Once again, you can get the Data value for your CNAME from the PowerShell command you ran earlier in this tutorial.
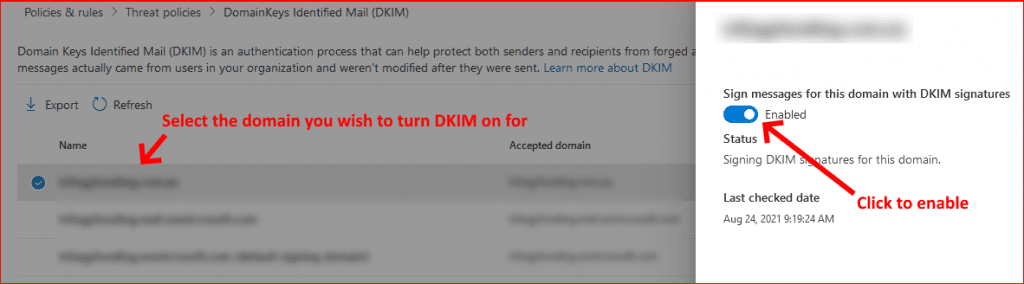
Once you've created the two DKIM CNAME records, you can now log onto your tenants Defender portal via the following link... and select Policies & Rules > Threat Policies > DKIM. Now follow the screenshot below. Once you've clicked enable, if you've setup your DNS records correctly you shouldn't receive an error message, just confirmation that it's complete:
Finally we're now going to setup the DMARC TXT DNS records. I'm not going to go into the details of what the DMARC tags mean, you can review that for yourself here... and that will give you a detailed explanation and help you create yours to suit your needs.
Now go back to your domain's DNS admin portal and add the following TXT record:
Record Type: TXT
TTL: 3600
Host: _dmarc.yourdomain.com.au
Data: v=DMARC1; p=quarantine; rua=mailto:[email protected]; ruf=mailto: [email protected]; fo=1;
Replace [email protected] in th example above with a valid email address that the mail server DMARC reports can be sent to. Also ensure you have changed the policy of the DMARC to suit your setup. The example above marks the failure as quarantine which will put the email in the users Junk folder. Perhaps to start off, change that to none so you can monitor the results.
That's it, you've successful setup O365 DKIM and DMARC. You can see the results of your work by running a check at the following site... Input your domain in the Domain Name field and the selector you wish to test in the Selector field. So using the example we've setup above the Domain Name field will be yourdomain.com.au and the Selector field would be selector1 because that is our active selector. See fields screenshot in the example below:

***Please note: Only one selector is active for your O365 DKIM record which by default is selector1. You can rotate your selector through the Defender portal above if you wish to use selector2. The reason I mention this is because is you run a check on selector2 it will fail, so you need to be aware of this.
Finally, you can test the validity of your DMARC record here...
If you've found this useful, you may want to sign up to our newsletter where you'll receive notices on when we post new articles and helpful "how tos". Just fill out your details below and we'll do the rest…