


Recently we started working with a small client that had a HP ML30 server installed by their previous IT provider. The OS, Win 2019 Essentials, was installed on the physical hardware rather than under a hypervisor like VMWare or Hyper-V.
We wanted to install a few CentOS virtual machines with some unusual configurations, so we decided to run a test environment here in our office before rolling it out to the client. We run VMWare Esxi 6 U2 here, so decided to download the trial version of Win 2019 Essentials and install it as a guest under Esxi.
So what is the problem? Because we wanted to nest a Hyper-V hypervisor under VMWare there are a number of issues that you need to address to ensure it runs and we've documented those here so you don't have to waste the time we did researching the issue. The main problem being that the CentOS VM, or any VM for that matter, that was installed within the nested Hyper-V instance could not access the internet.
To outlined the setup again, we have:
- VMWare Esxi 6 U2 as the host
- Win 2019 Essentials as the guest
- Win 2019 guest will have a nested Hyper-V instance configured
Lets start...
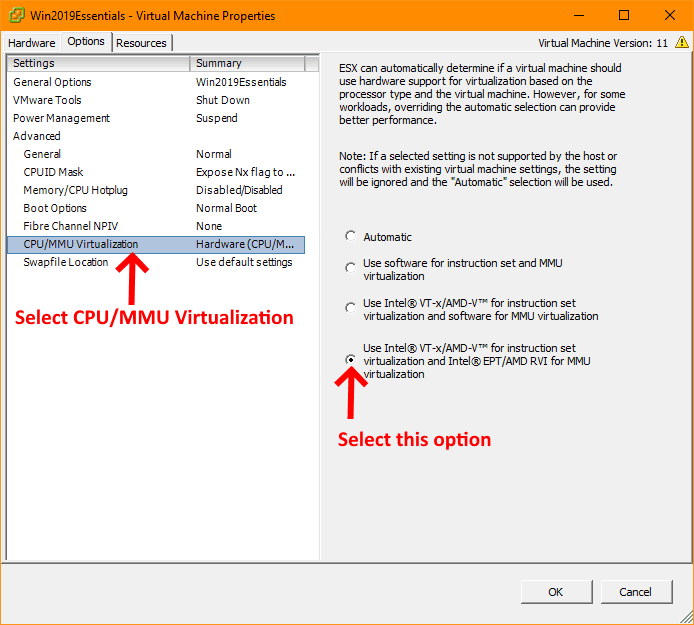
Create your Win 2019 virtual machine with your preferred settings but do not start the machine because we have some additional configuration to do. We're using the vSphere client here in this example, but you can use the Web UI is you wish as well. Once your VM is created, edit the machine's settings and follow the screenshot below:
We're now going to edit the virtual machine's vmx file and add a few entries to ensure it allows a hosted hypervisor. Download the vmx file onto your computer and edit it with notepad or your favourite text editor and add the following 2 lines at the end of the file:
hypervisor.cpuid.v0 = "FALSE"
vhv.enable= "TRUE"
Save the file and upload and overwrite your existing vmx file in your VMWare machine.
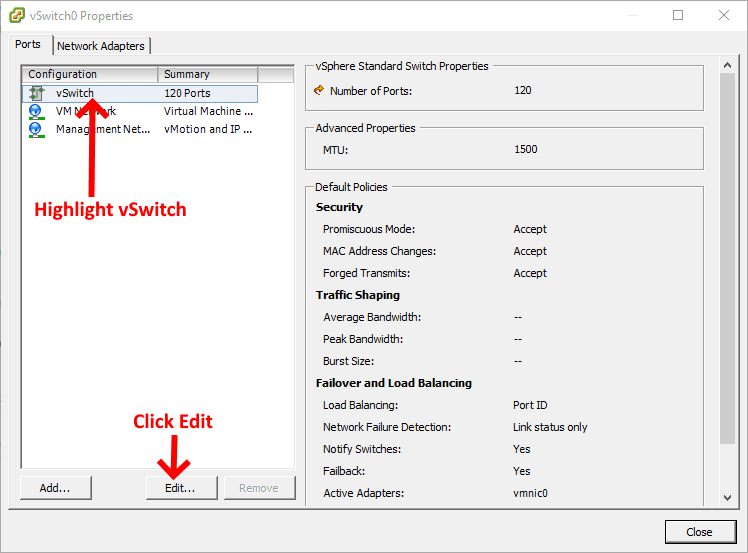
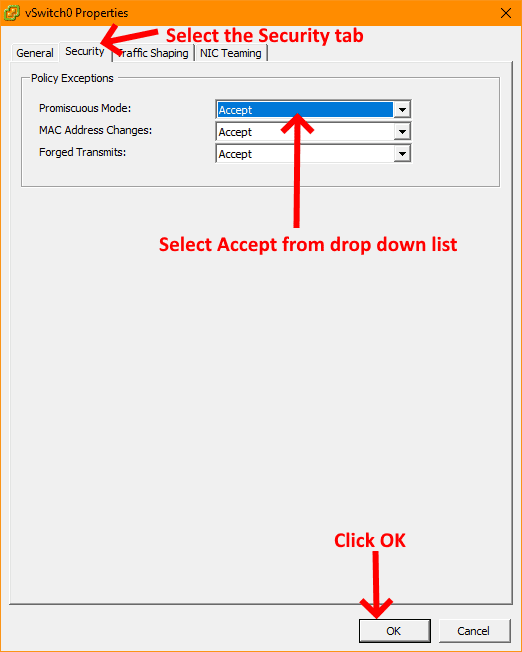
Now we need to change the Promiscuous Mode on the vSwitch that your machine is connected to. From your vSphere Client go to Configuration > Networking and click on the Properties link associated with the vSwitch your VM is connected to. In my case it was vSwitch0, but yours may be different. Now follow the screenshots below:
Now you can can start your Win 2019 Essentials VM and you will be able to install the Hyper-V role and have internet connectivity for the the guest OS instance your install on your Hyper-V nested hypervisor.
If you've found this useful, you may want to sign up to our newsletter where you'll receive notices on when we post new articles and helpful "how tos". Just fill out your details below and we'll do the rest...


2 Responses