


This is just a quick "How To" to create Permalinks for your WordPress site. The reason for this article is because it took me a while to dig up this information even from the WordPress Wiki so I thought I would save everyone the same arduous task and simplify it for everyone instead of reading through reams of meaningless information. This can be done when you have your own VPS or dedicated server where you have full root access. Let's get started....
Open up WinSCP, connect to your site and open the file /etc/httpd/conf/httpd.conf in your preferred text editor. Within the file find:
AllowOverride <Directory "/var/www/html">
#
# Possible values for the Options directive are "None", "All",
# or any combination of:
# Indexes Includes FollowSymLinks SymLinksifOwnerMatch ExecCGI MultiViews
#
# Note that "MultiViews" must be named *explicitly* --- "Options All"
# doesn't give it to you.
#
# The Options directive is both complicated and important. Please see
# http://httpd.apache.org/docs/2.2/mod/core.html#options
# for more information.
#
Options Indexes FollowSymLinks
#
# AllowOverride controls what directives may be placed in .htaccess files.
# It can be "All", "None", or any combination of the keywords:
# Options FileInfo AuthConfig Limit
#
AllowOverride None
#
# Controls who can get stuff from this server.
#
Order allow,deny
Allow from all
</Directory>
The reason I highlighted a large chunk of the file is because there are 2 areas where AllowOverride can be changed. We want to make sure we change the correct one. Now change:
AllowOverride None
To:
AllowOverride All
Save and close the file.
Now we'll open the admin section of your WordPress site and navigate to Settings > Permalinks and you should see the following options:
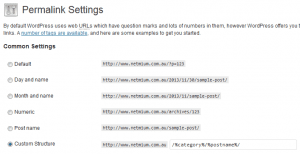
In my case I've selected Custom Structure in the example above which will give me an end result for this Post like this:
http://www.Matrix7.com.au/how-tos/wordpress-permalinks-how-to/
You can use any of the options above to suit your needs, except for the first option which is used when you don't want to use Permalinks. Once you have made your selection scroll down and click Save Changes. Once the changes have been saved you will notice the code required for your .htaccess file in the grey text box like so:
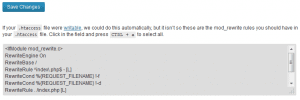
Now in the root of your website we want to create a .htaccess file, so in my case the path to my website is /var/www/html/myawesomesite/public/. Change the path to suit your needs to where your site is located. Once the .htaccess file is created, open it in your text editor and paste the code from the grey text box above and save the file.
Now we need to restart your Apache web server for the changes to take effect. Open Putty and log onto your server and type in:
service httpd restart graceful
Now open your browser and test your WordPress site to ensure the end result is what you're after. If it worked, consider yourself a God! 🙂
If you've found this useful, you may want to sign up to our newsletter where you'll receive notices on when we post new articles and helpful "how tos". Just fill out your details below and we'll do the rest...


