


What I am going to show you today is how to convert a Windows Server Standard Evaluation Edition installation to be able to accept an Open License MAK Serial license.
Why would you want to do this? Well we just went through this and it took us quite a while to get the definitive answer from Microsoft on how this is to be done so we thought we would document the procedure to save you the time and effort.
We had set up an RDP solution for a client as a proof of concept to test whether all their software and requirements were met within a Windows 2019 RDP environment. We did this using the Windows 2019 Standard Evaluation Edition that can be downloaded from Microsoft's website.
This took about a week of configuring and testing various software packages etc, and once we confirmed that everything was good to go, we didn't want to have to re-install and re-configure the whole system again.
We contacted Microsoft to see whether this could be done and they confirmed that DISM can be used for this exact purpose. What is DISM? DISM stands for Deployment Image Servicing and Management and is a command-line tool that can be used to service and prepare Windows images. You can read about it further here...
Now let's get started making the necessary changes by following the steps below:
- Before doing anything, ensure you have a valid backup of your server(s) before commencing this procedure in case something does go wrong
- First we need to convert the Win 2019 Evaluation Edition to the Win 2019 Retail Version. Once that's complete, we can then convert that to the Volume License or Open License version that we want to end up with. To do that we need to use the Standard setup key here N69G4-B89J2-4G8F4-WWYCC-J464C that Microsoft has provided. This only enables the conversion and is not a valid serial number to use indefinitely
- Open PowerShell as an Administrator and run the following command: dism /online /set-edition:ServerStandard /productkey:N69G4-B89J2-4G8F4-WWYCC-J464C /AcceptEula
- Allow that command to complete. It took about 5 minutes in my case, and once done you must reboot the server
- Once the server has rebooted, log on as the administrator and once again open PowerShell as Admin and this time we're going to use the Microsoft Open License MAK key that was provided to you by your reseller. It's the 25 digit serial you obtained from the Microsoft Volume License Service Centre portal here...
- From your admin PowerShell window, run the following: Slmgr /upk
Slmgr /ipk <Your 25 Digit MAK You Copied From The VLSC Portal>
Slmgr /ato - You should receive a couple of pop up windows confirming the successful registration of your Windows Edition
- To confirm that your edition of Windows has successfully registered press the Windows key + i to open up the Windows Settings screen then choose Update & Security > Activation. The screen should look like the example below:
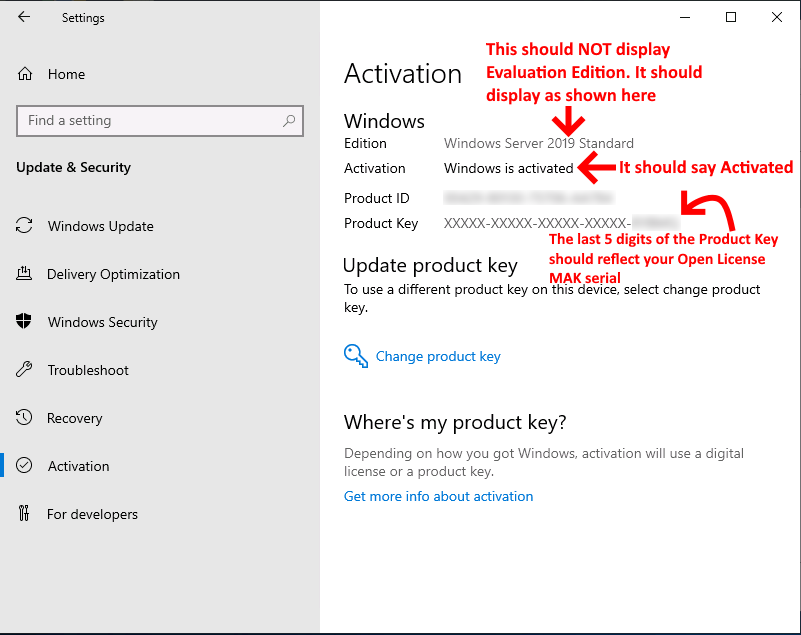
Your conversion is now complete!
If you've found this useful, you may want to sign up to our newsletter where you'll receive notices on when we post new articles and helpful "how tos". Just fill out your details below and we'll do the rest...


2 Responses